
Making the MakerBot Make again.
For makers, 3D printers have become part of the furniture. For our international readers, this expression means ‘ubiquitous’. I came to the 3D printing game relatively late, but very quickly got up to speed.

3D or Not 3D, that is the question
Here’s a little story on my introduction to 3D printing, just to set the scene.
A while back I was creating a video series on the capabilities of a microelectronics company, and it was time to show how they used 3D printers to rapidly prototype enclosures for their boards.
On attempting to demonstrate this, they informed me that it was ‘broken’ and that they would have to postpone the shooting of that particular segment. I will tell you that I am known by another name- and that name is ‘Mr. Fix It’. It was with this in mind that I proposed a solution. I offered to take the printer home and fix it, in exchange for being able to hold onto it for a while and print some parts.
On getting the supposedly ailing machine home (It was a 3D Systems Up model) I set to work diagnosing the problem. It was in that moment that I discovered that there actually was no problem! I also discovered something quite important about 3D printing- it can be especially fiddly; ‘fiddly’ being a technical term for ‘sensitive to initial conditions and settable parameters’.
I can’t recall exactly what might have been causing issues for the owners- perhaps the printer needed a calibration (I started with one) or perhaps they had not been printing with rafts (I used them) but in any event, I had upheld my side of the bargain and as such I embarked on printing some pieces; specifically the pieces required to scratch-build an open source Prusa Mendel printer of my own.
I learned a lot during that time, and after a few weeks of spare time I had a working printer, and I was well and truly into the world of 3D printing. In the interim I have used that printer to print the parts for a larger 3D printer, a handwriting machine, a CNC foam cutter, a CNC router, and have converted the original Prusa into a LASER cutter, but that is a tech article for another time.
In this article I’ll discuss how the Makerbot Replicator I’ve been using since I joined streaker recently died, and how I’ve brought it back to life.
A Common Problem
I had used the Makerbot Replicator on and off for months without issue. Sure, I had to print some clamps to hold the extruder firmly in place to avoid the dreaded “Error 54“ but other than that, it worked reasonably reliably. It’s hardly the world’s most silent printer, but the prints usually turned out fairly nicely.
However, I recently experienced what I have come to discover is a common problem with this model. Partway through a print the machine simply stopped printing. This had never happened before, and the LCD was blank, and so I had a bad feeling about the situation. I didn’t think the IT Crowd solution of turning it off and on again would work, but of course I tried it anyway. No joy.
Normally I would immediately launch into trying to fix it myself, but it was a work machine so I opted instead to book it in for analysis and possible repair at a local 3D printer shop. On bringing the printer into their workshop I was greeted by a friendly technician who wanted to make it clear that as she was going away for a while, I should be aware that the repair wouldn’t be quick. I figured I should let her know what the symptoms were, and immediately on telling her she knew what the issue was. You see, it turns out this problem is endemic to this model of 3D printer; that problem is simply that the power supply had died.
This was good news in a sense, because the Makerbot Replicator uses an ATX PSU, and I had a few of those on hand. The bad news was that the particular model it uses is a slim profile variant, and the tech. let me know that Makerbot no longer offered them as a spare part. Still, I reckoned if I could at least determine that the problem was a faulty PSU, I would be making a step in the right direction, and I could still print if I absolutely needed to. I was also keen to see if such a slim profile version was available elsewhere.
It was, but with some caveats:
The ATX plug of the new PSU is has 4 extra sockets, but thankfully these are easily separated from the main plug. In the end this was unnecessary anyway- see immediately below.
The cord of the ATX plug is slightly shorter than the Makerbot one, and so I needed to extend it. I did this by using the original plug, and for each wire, carefully found the matching wire on the new power supply, cut it, stripped it, stripped the wire of the original plug, remembered to load on some shrink tube, soldered it, and then heat shrunk the joint. This was tedious but as the Makerbot requires fewer wires than the entire ATX supply, it wasn’t as bad as it initially seemed. I cut and insulated the redundant wires from the new power supply. I originally intended to leave them connected, but there is very little spare space, and so this would have made things difficult when it came time to close up the printer.
The new PSU does not have a power switch. This is no huge deal, as I’m plugging it into a switched power strip anyway.
Here is a link to the PSU I purchased: https://au.rs-online.com/web/p/pc-power-supplies/6667019/
An Easy Solution
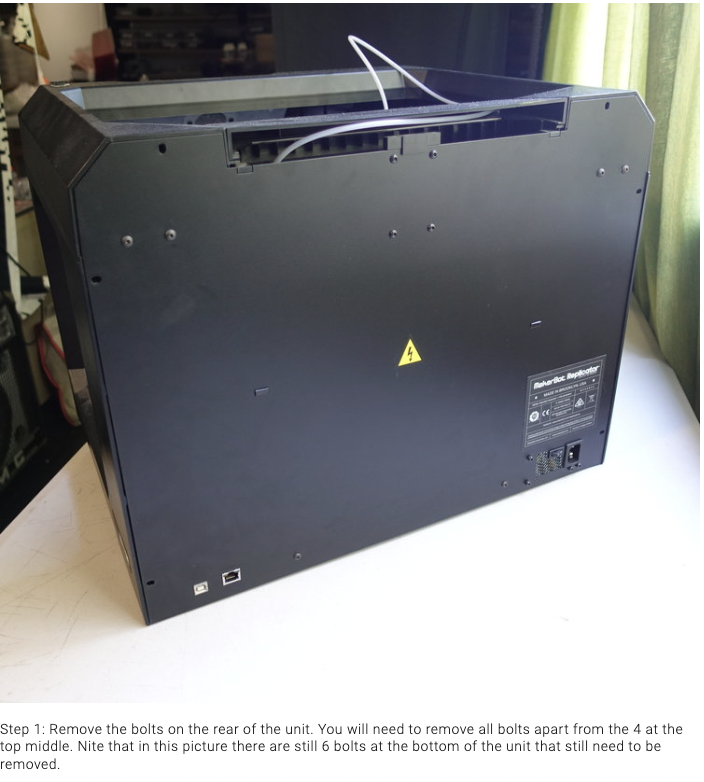
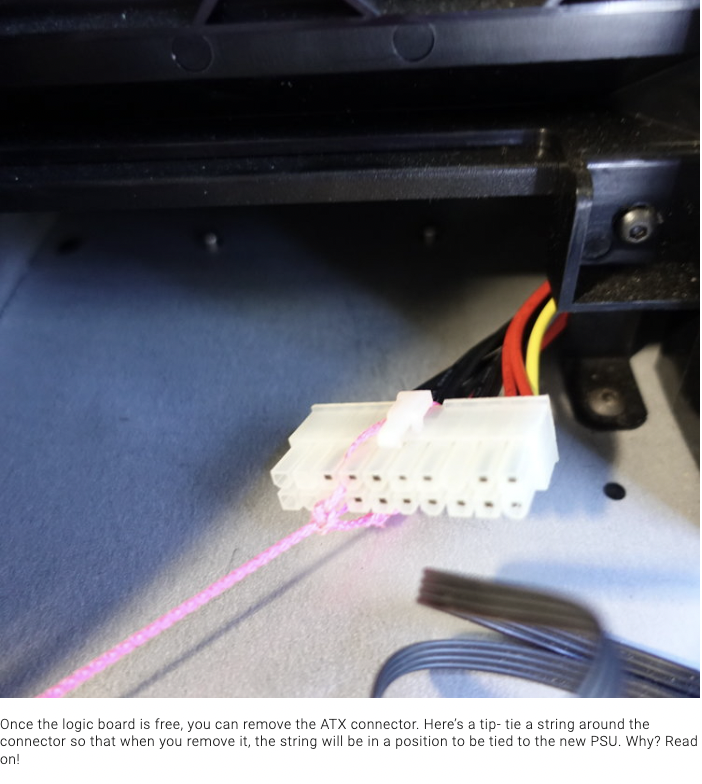
Here’s a guide to replacing the PSU. Hopefully it goes without saying that you should unplug the power and any Ethernet or USB connections to the printer.

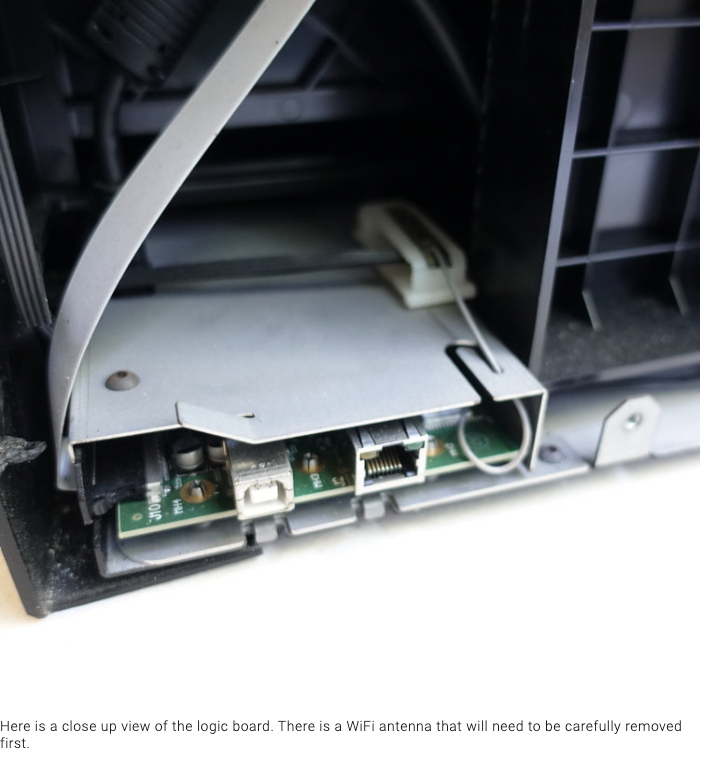


Once I’d received the new PSU and had modified it so that the cable lengths were long enough, I tested by plugging it into the logic board and powering it up. It all worked, and so I reinstalled it into the case. When you do this, take your time and be careful. The motor driver cables need to be routed on the outside of the logic board’s metal case. Have a close look at the picture in this article that says ‘Here is a close up view of the logic board’ - it will help you see how the cables have to be routed.
Good luck and happy printing!
Stay tuned for an article on how we use 3D printing technology at Streaker..